2026复现文档
路虽远,行则将至;事虽难,做则必成
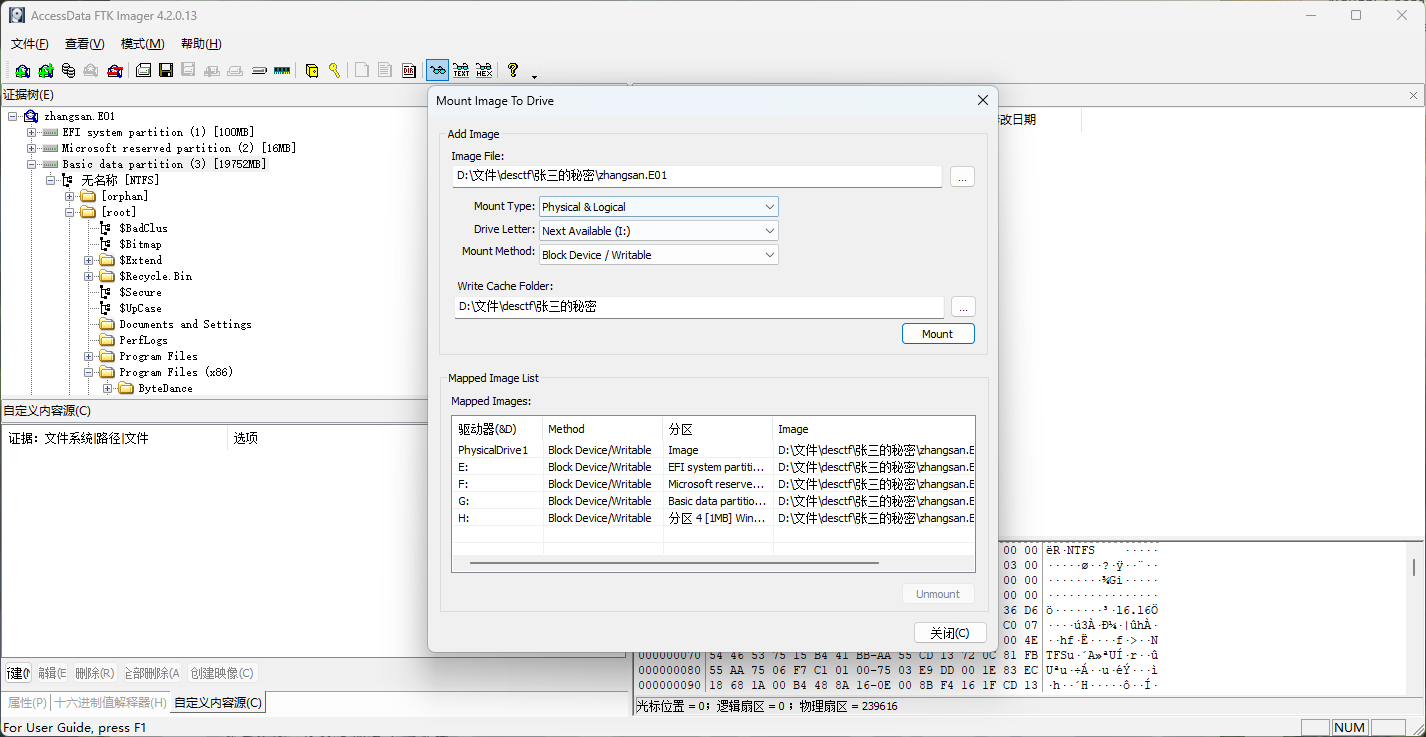
DesCTF 2026 张三的秘密 使用FTK imager image mount…
挂载成功:
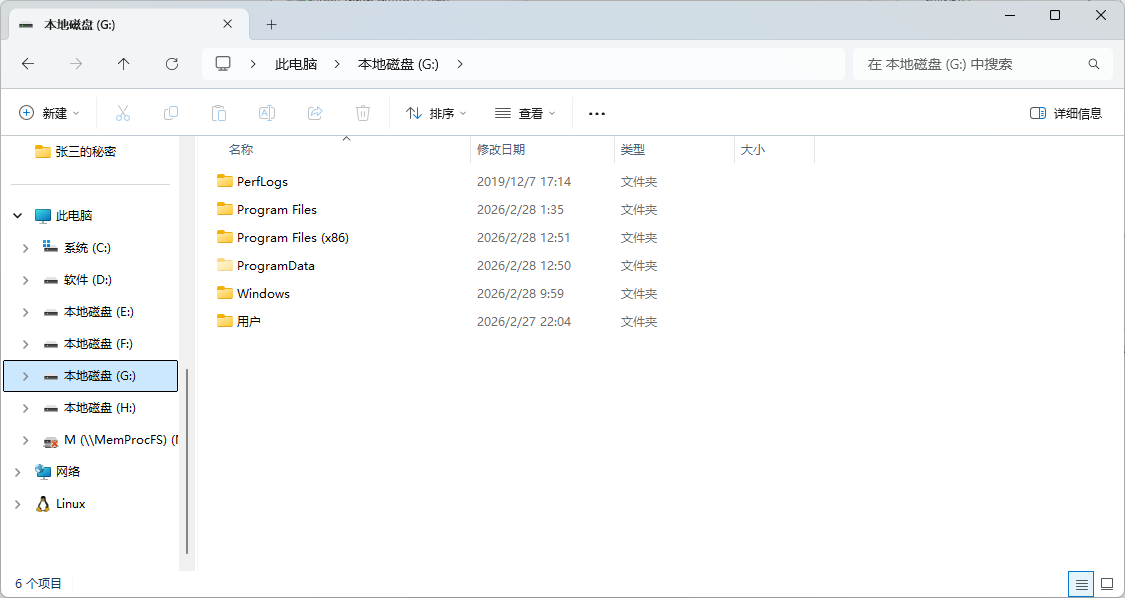
先浏览一般主要的文件夹:
在Users\张三\Pictures\Screenshots有两张批注,
其中一个没有内容,左上角有一个fakeflag:
第二张发现了hint,结合题目信息,知道了这是Shamir’s Secret Sharing,需要五个密钥,在上图中已经发现两个。
继续查找,桌面上有一张二维码,扫描得到第三个key:
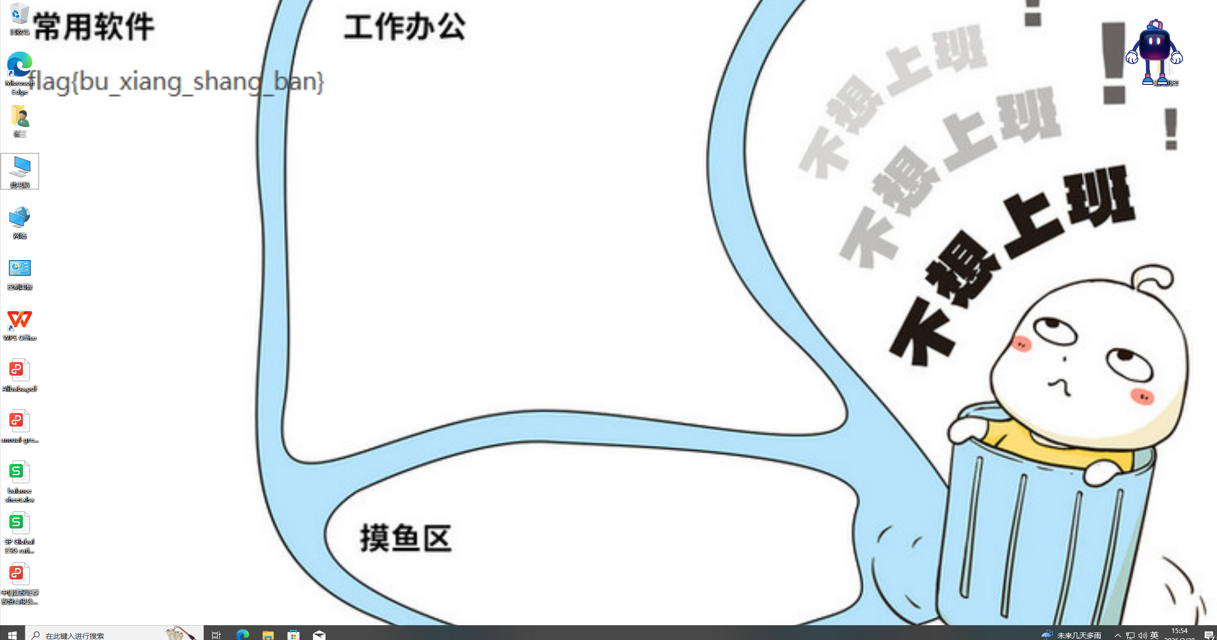
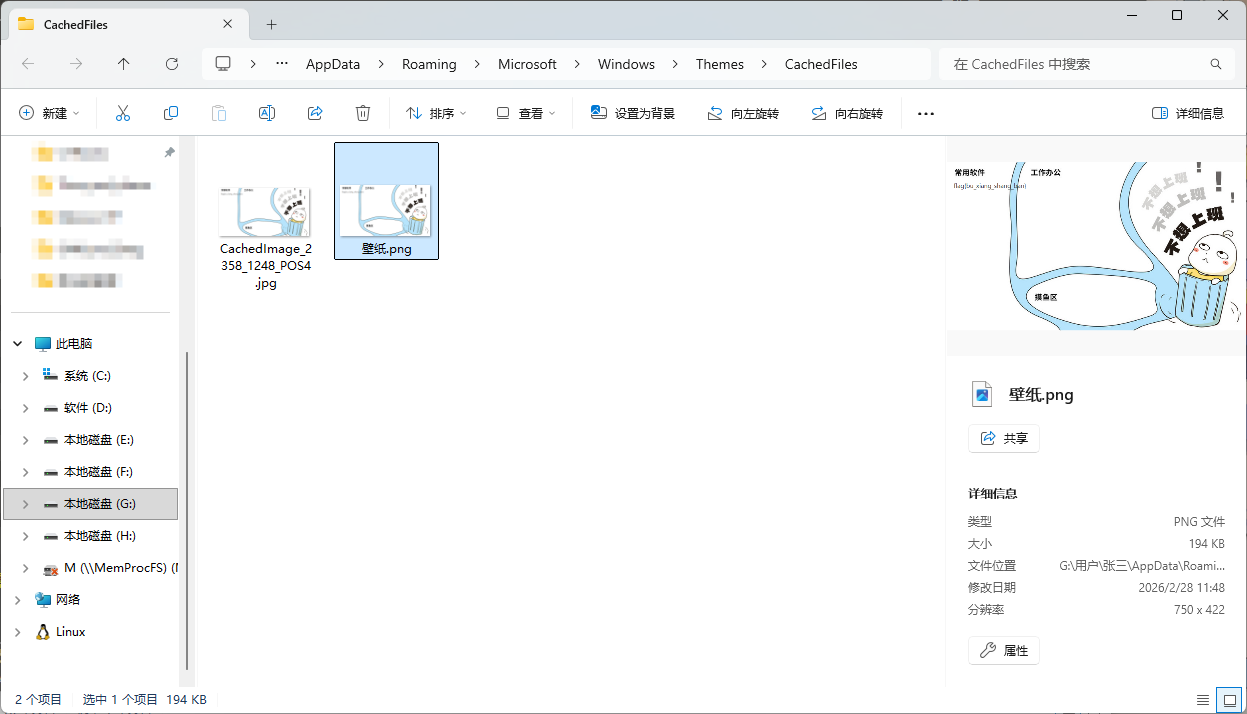
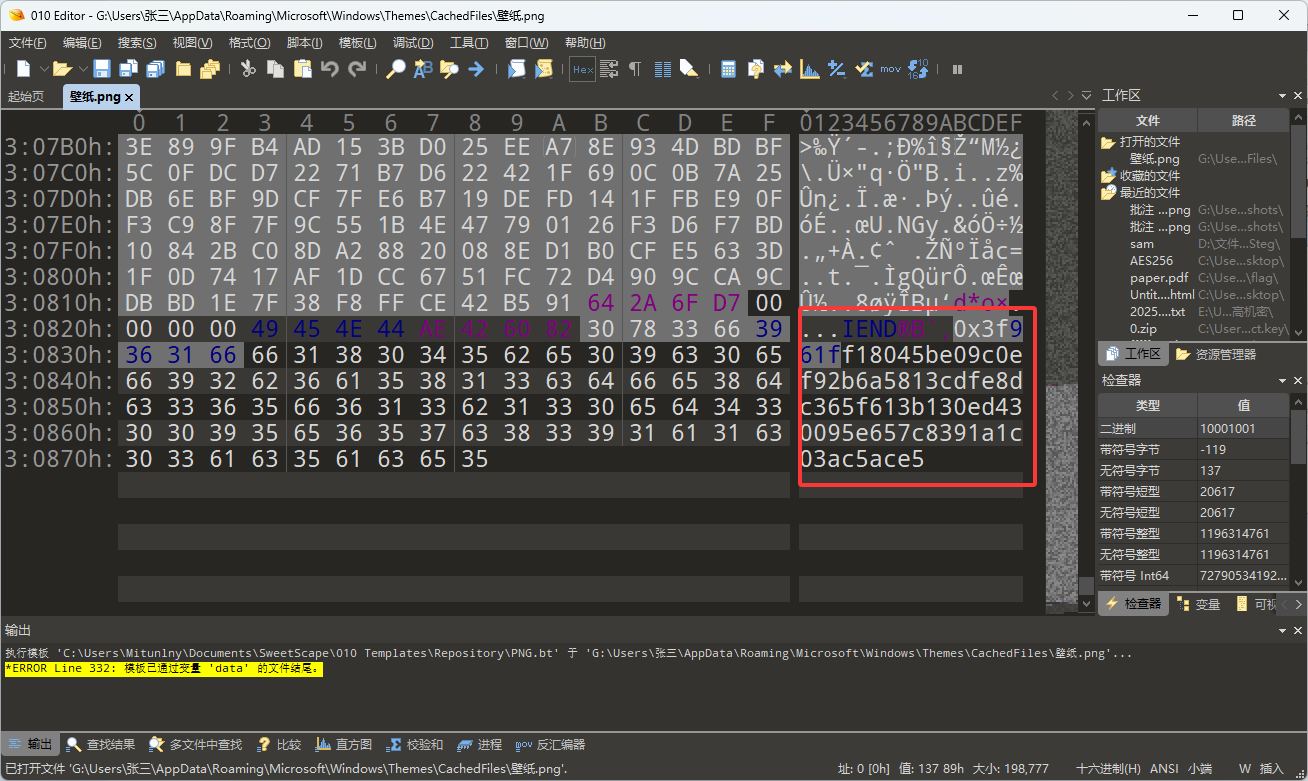
第四个key是在桌面的壁纸中,需要找到壁纸文件夹,在png的末尾找到key:
\Users\张三\AppData\Roaming\Microsoft\Windows\Themes\CachedFiles
第五个暂时不知道如何出的…
又是羡慕火眼的一天
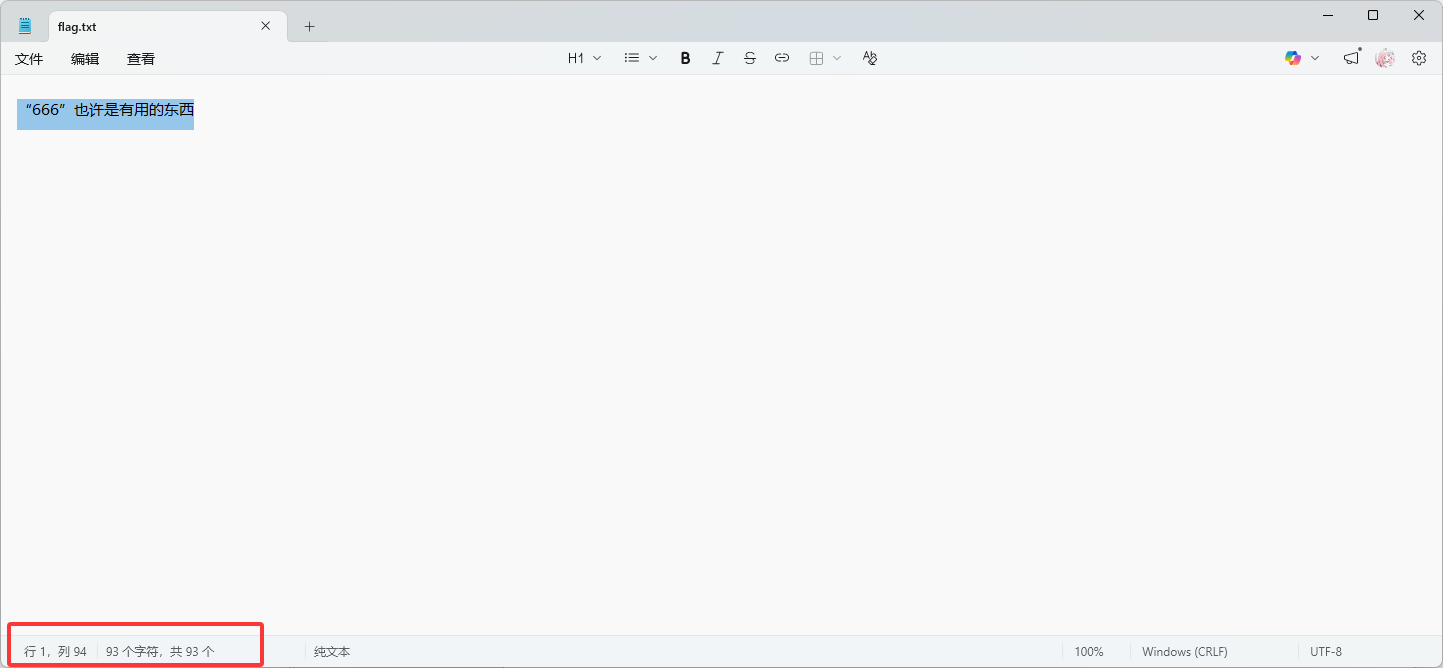
楚慧杯2026 Time_and_chaos 给了1-8个png,flag.png,flag.txt。
可以发现的是这些png有很多的噪点,不过可以隐约看到右上角有内容:
那么我们要做的其实是对图片进行降噪处理。
可以利用多张相似图像的统计特性进行图像降噪和恢复,通过合并多张带噪图像,使用统计方法去除噪声,最终恢复出清晰的flag图像:
1
2
3
4
5
6
7
8
9
10
11
12
13
14
15
16
17
18
19
20
21
22
23
24
25
26
27
28
29
30
31
32
33
34
35
36
37
38
39
40
41
42
43
44
45
46
47
48
49
50
51
52
53
54
55
56
57
58
59
60
import osfrom pathlib import Pathimport numpy as npfrom PIL import Imagedef load_images (paths ): """读取图片并转换为 numpy 数组""" return np.stack([ np.asarray(Image.open (p).convert("RGB" ), dtype=np.float32) for p in paths ]) def denoise (images ): """ 使用 median + mean 混合降噪 median 去除离群噪声 mean 平滑随机噪声 """ median_img = np.median(images, axis=0 ) mean_img = np.mean(images, axis=0 ) result = 0.7 * median_img + 0.3 * mean_img return np.clip(result, 0 , 255 ).astype(np.uint8) def save_image (array, path ): Image.fromarray(array).save(path) def recover (paths, output ): print (f"[+] 载入 {len (paths)} 张图片" ) images = load_images(paths) print ("[+] 开始降噪处理" ) clean = denoise(images) print ("[+] 水平翻转图像" ) clean = np.fliplr(clean) save_image(clean, output) print (f"[✓] 完成 -> {output} " ) if __name__ == "__main__" : candidates = [f"{i} .png" for i in range (1 , 9 )] + ["flag.png" ] paths = [p for p in candidates if Path(p).exists()] if not paths: print ("[-] 未找到任何图片" ) exit() recover(paths, "recovered_flag.png" )
得到恢复图像:
可以看到一部分flag: DASCTF{Logistic_and
得到第二部分flag
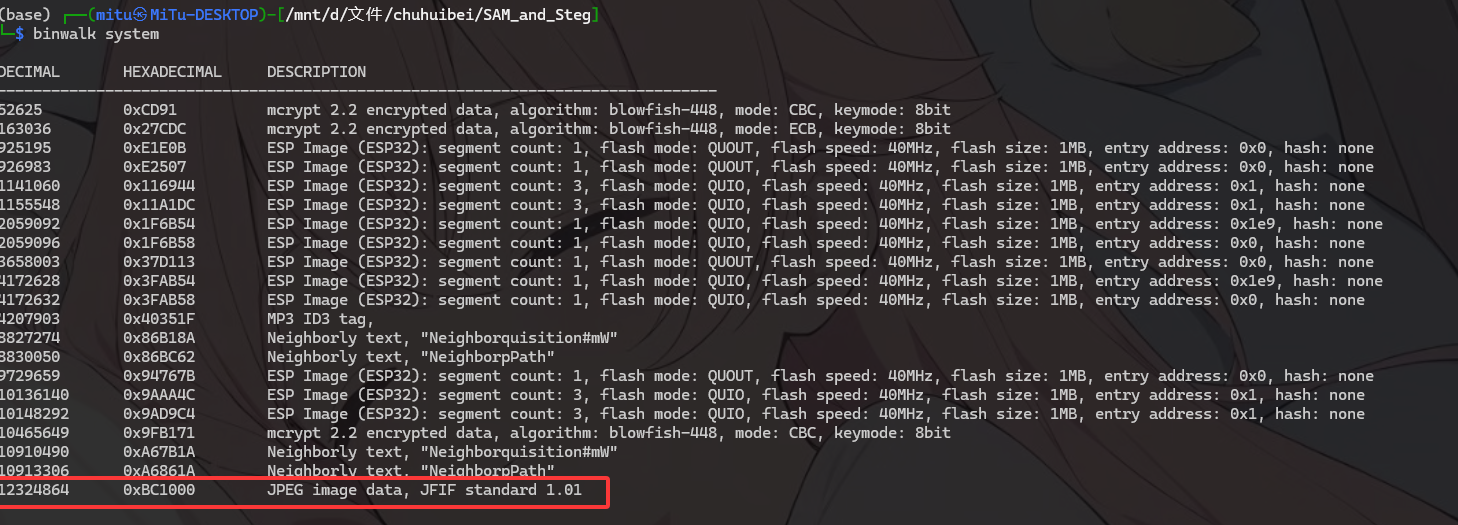
SAM_and_Steg 给了sam和system文件。
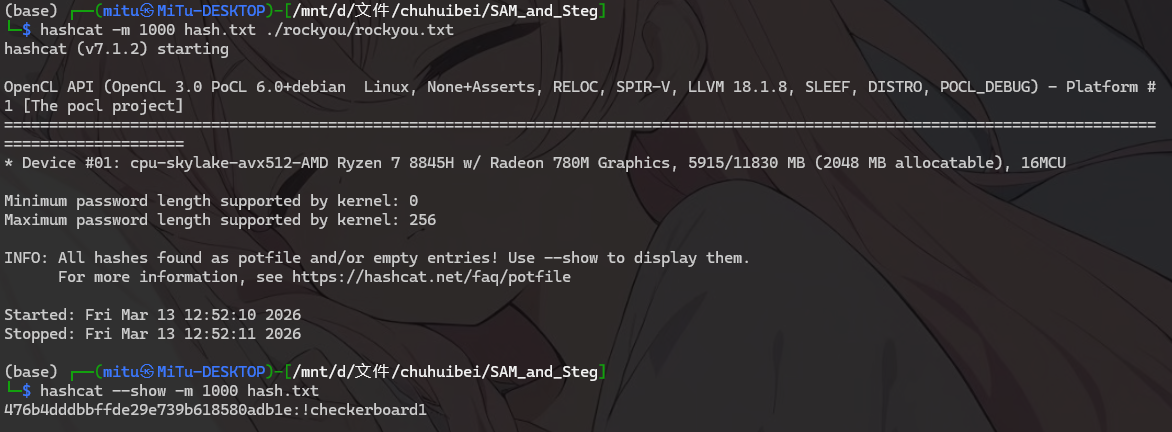
使用samdump2提取hash:
476b4dddbbffde29e739b618580adb1e
使用hashcat爆破:
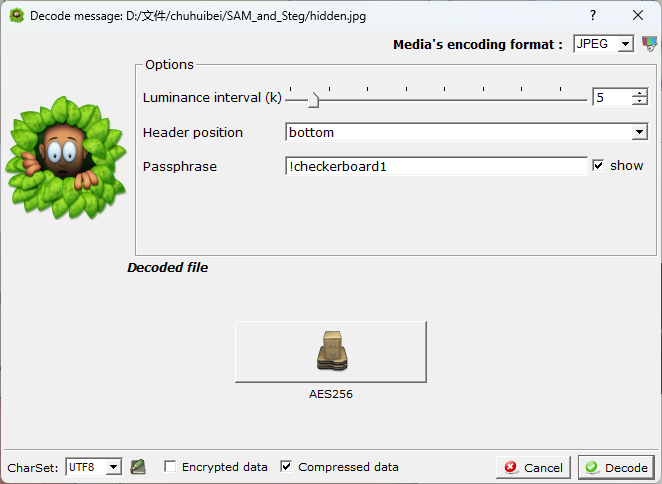
得到密码:!checkerboard1
binwalk检测system可以发现文件尾部嵌入了一张jpg图片:
提取图片:
使用密码解密,可以得到一个aes文件:
根据图片上的提示知道是 openssl,进行解密:
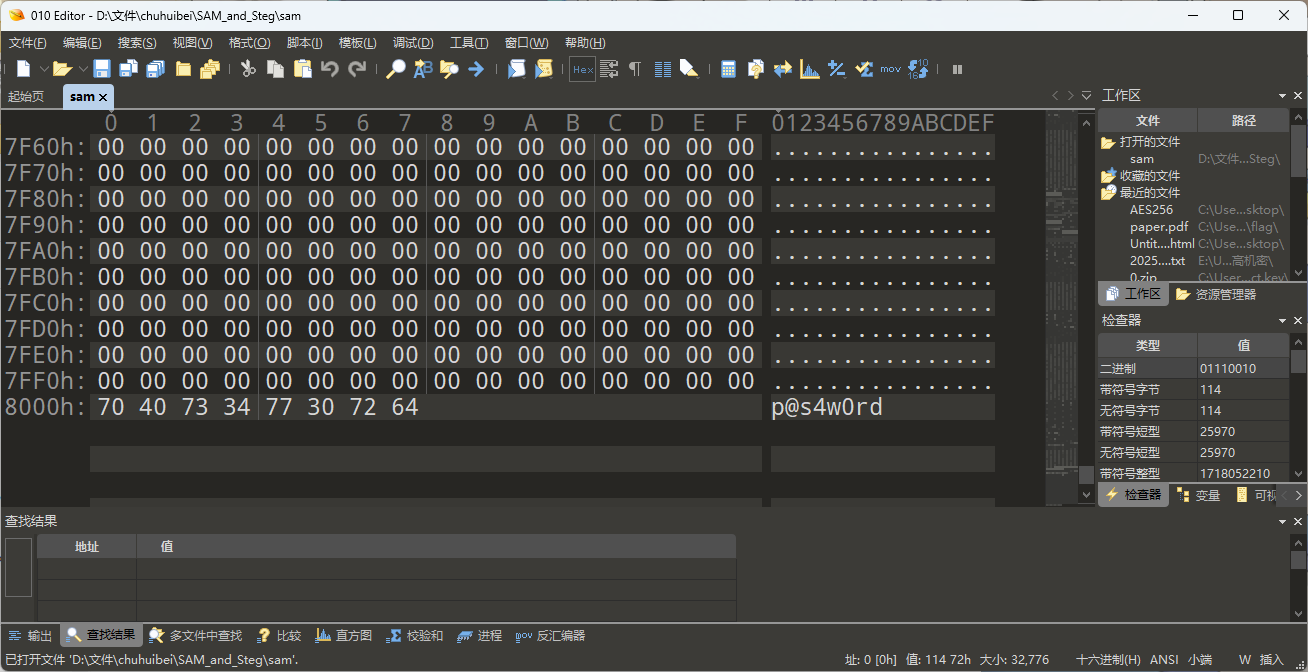
密码在sam的尾部:
openssl enc -d -aes-256-cbc -md sha256 -k p@s4w0rd -in AES256 -out 1.gztar -xvf 1.gz
DASCTF{aa28f51d-0f54-4286-af3c-86a14fbab4a4}
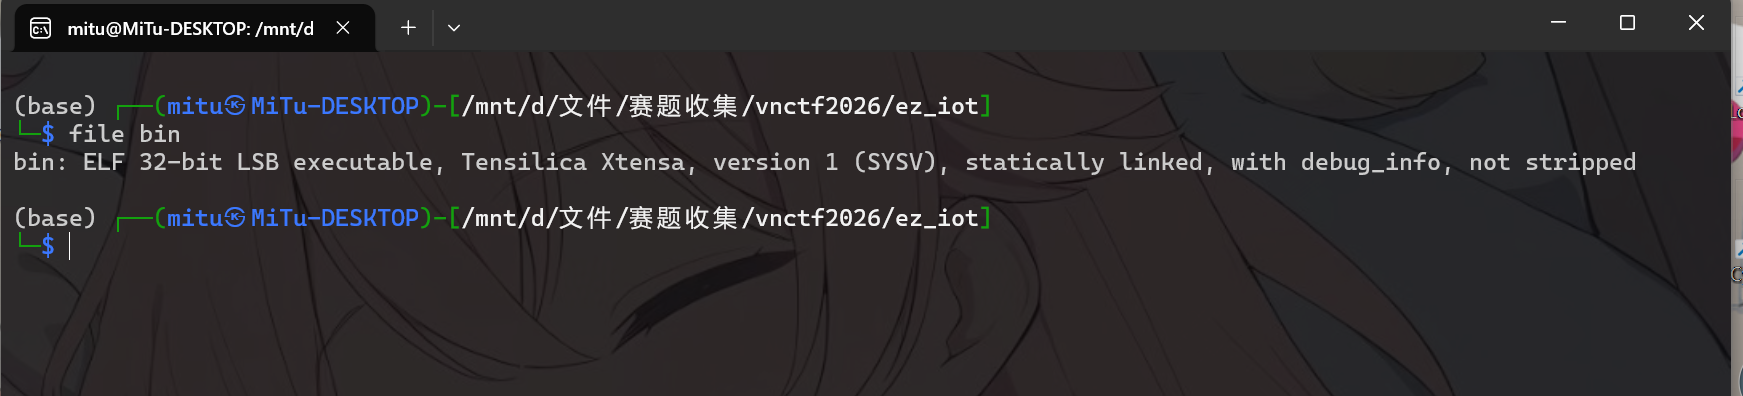
VNCTF2026 ez_iot 先看附件,一个bin和capture.raw,
file命令查看,可以发现bin为Xtensa架构的可执行文件。
由于这是iot题目,而在iot背景中,Xtensa架构通常用于ESP芯片的固件,可以猜到,题目的逻辑被编译到了这个esp固件里面。
使用ghidra进行逆向分析:
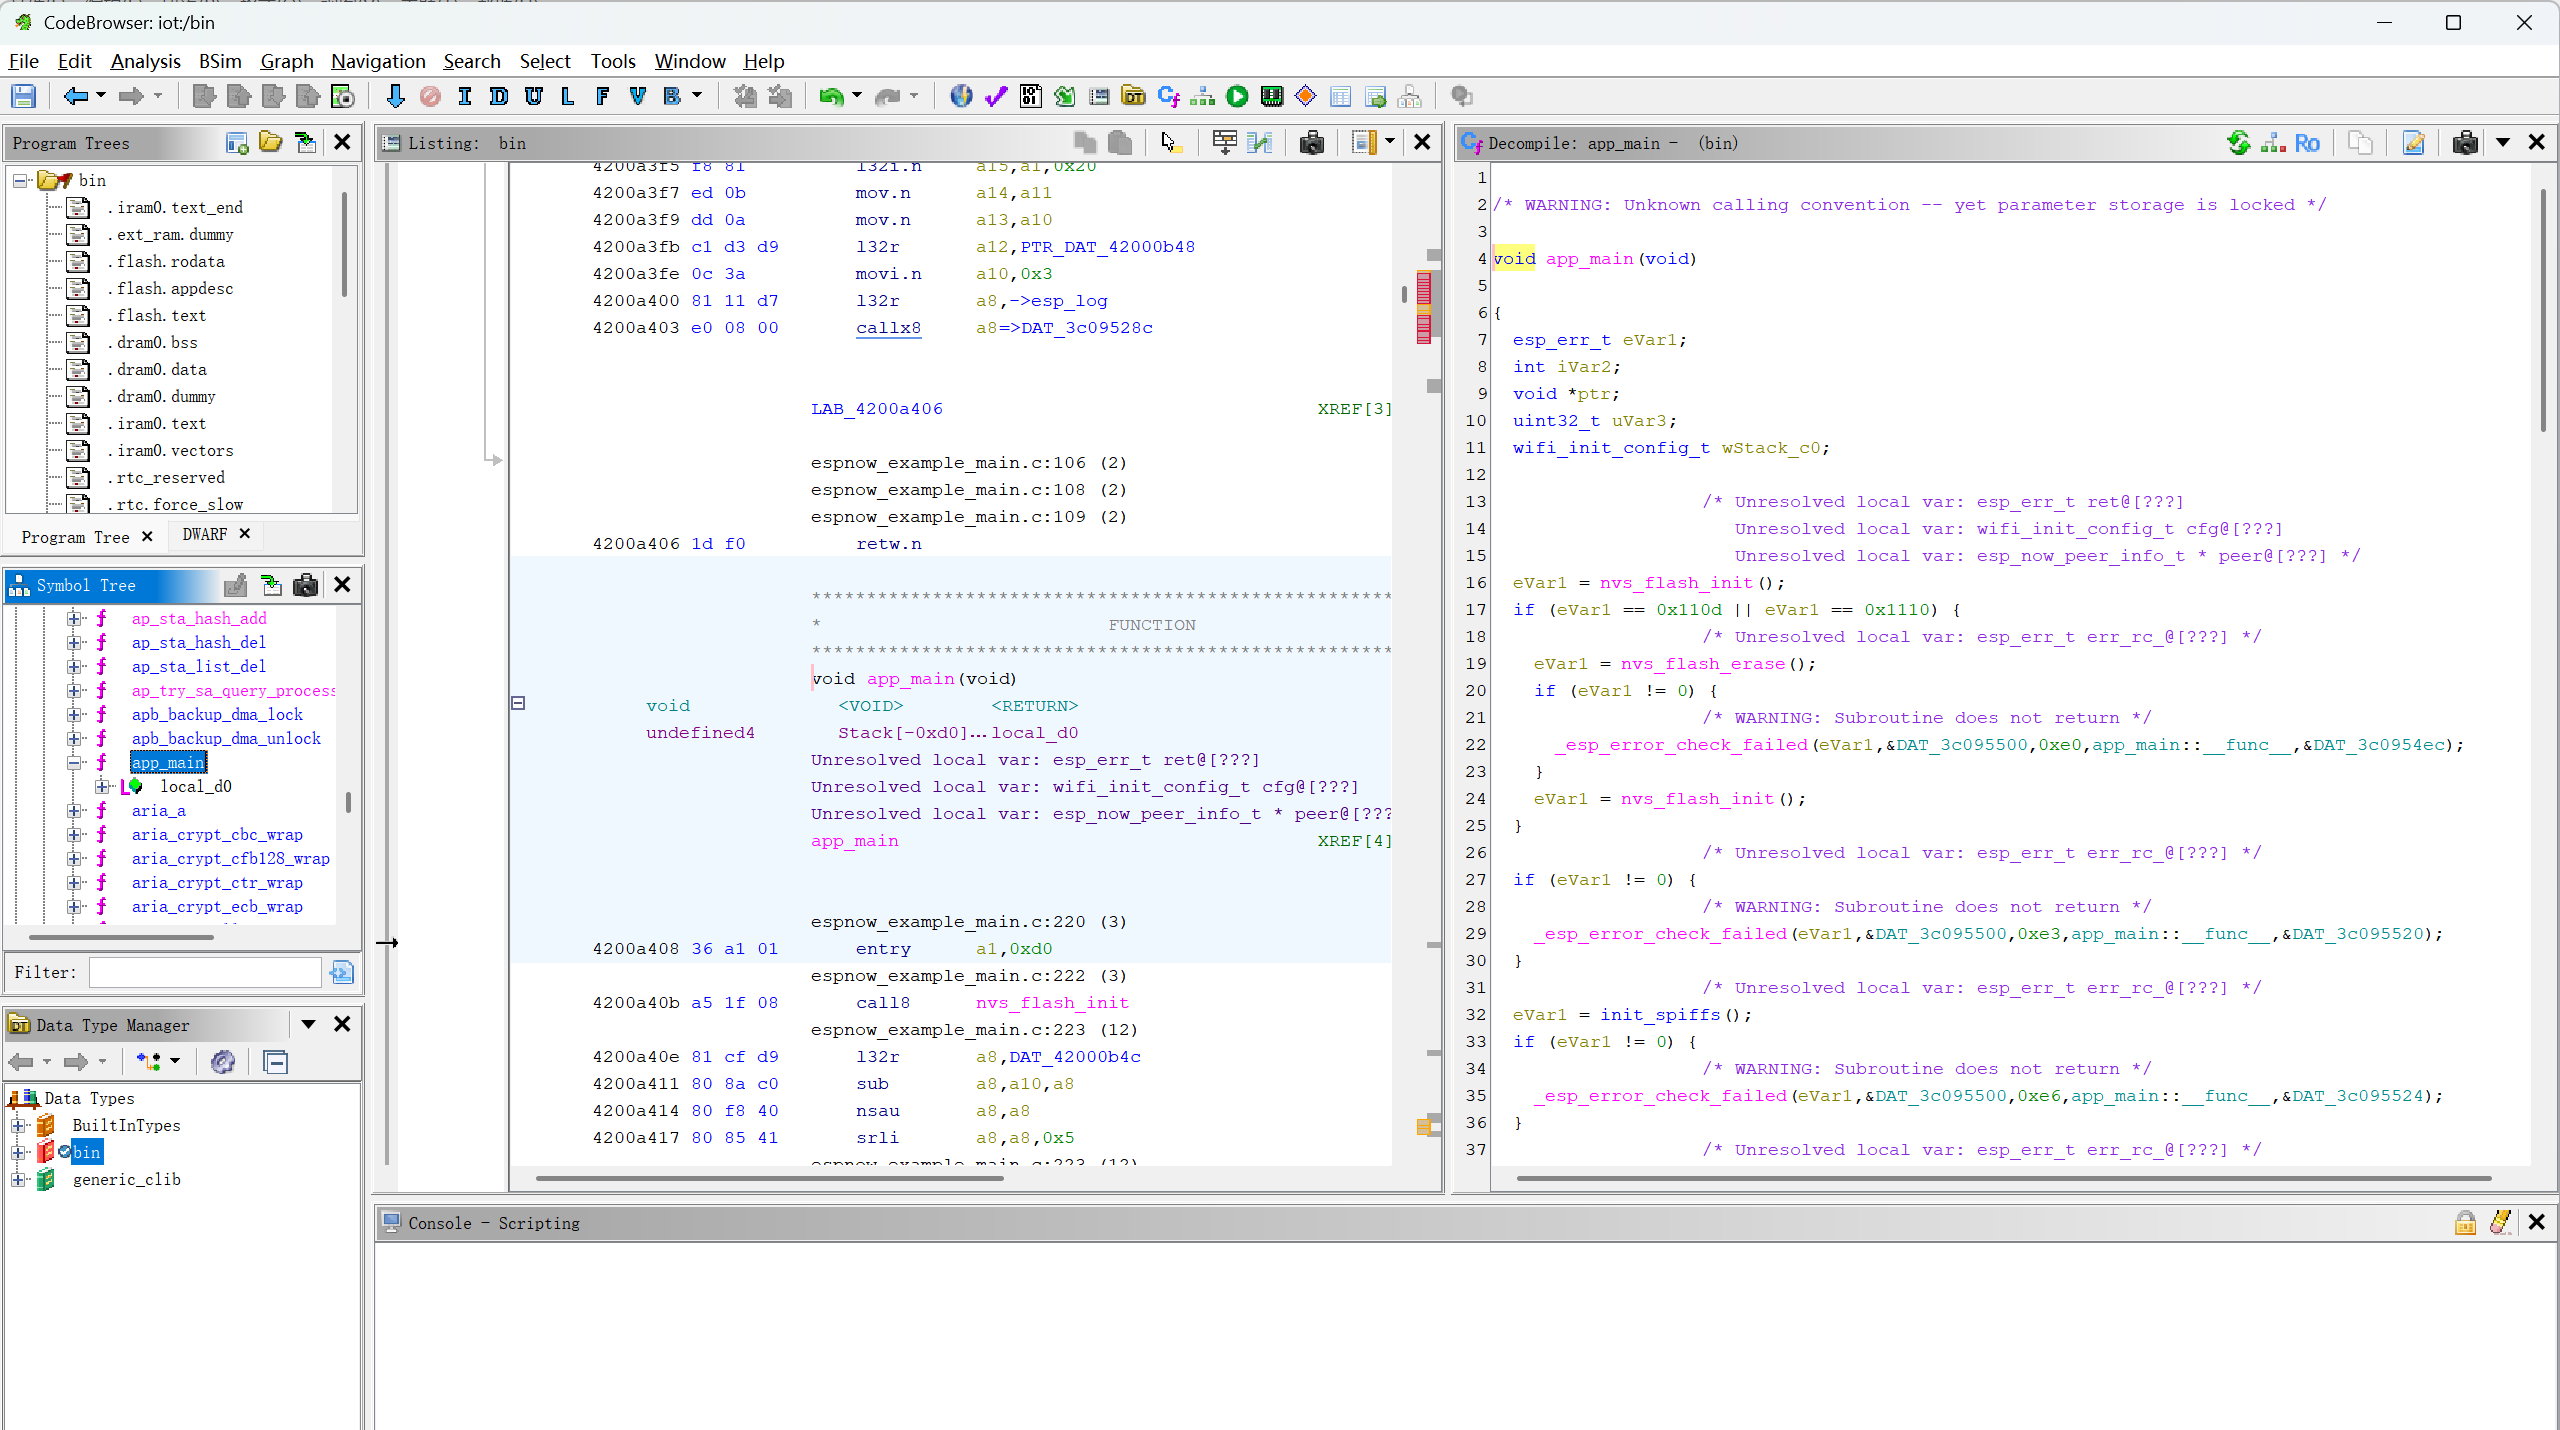
app_main是esp32的入口函数:
在app_main函数中,ESP-NOW通信的设置和初始化在esp_now_init()(行0xf3-0xfd),但实际的数据发送 是在sender_task任务中完成的。这是典型的ESP32编程模式:在app_main中初始化,在任务中执行主逻辑。
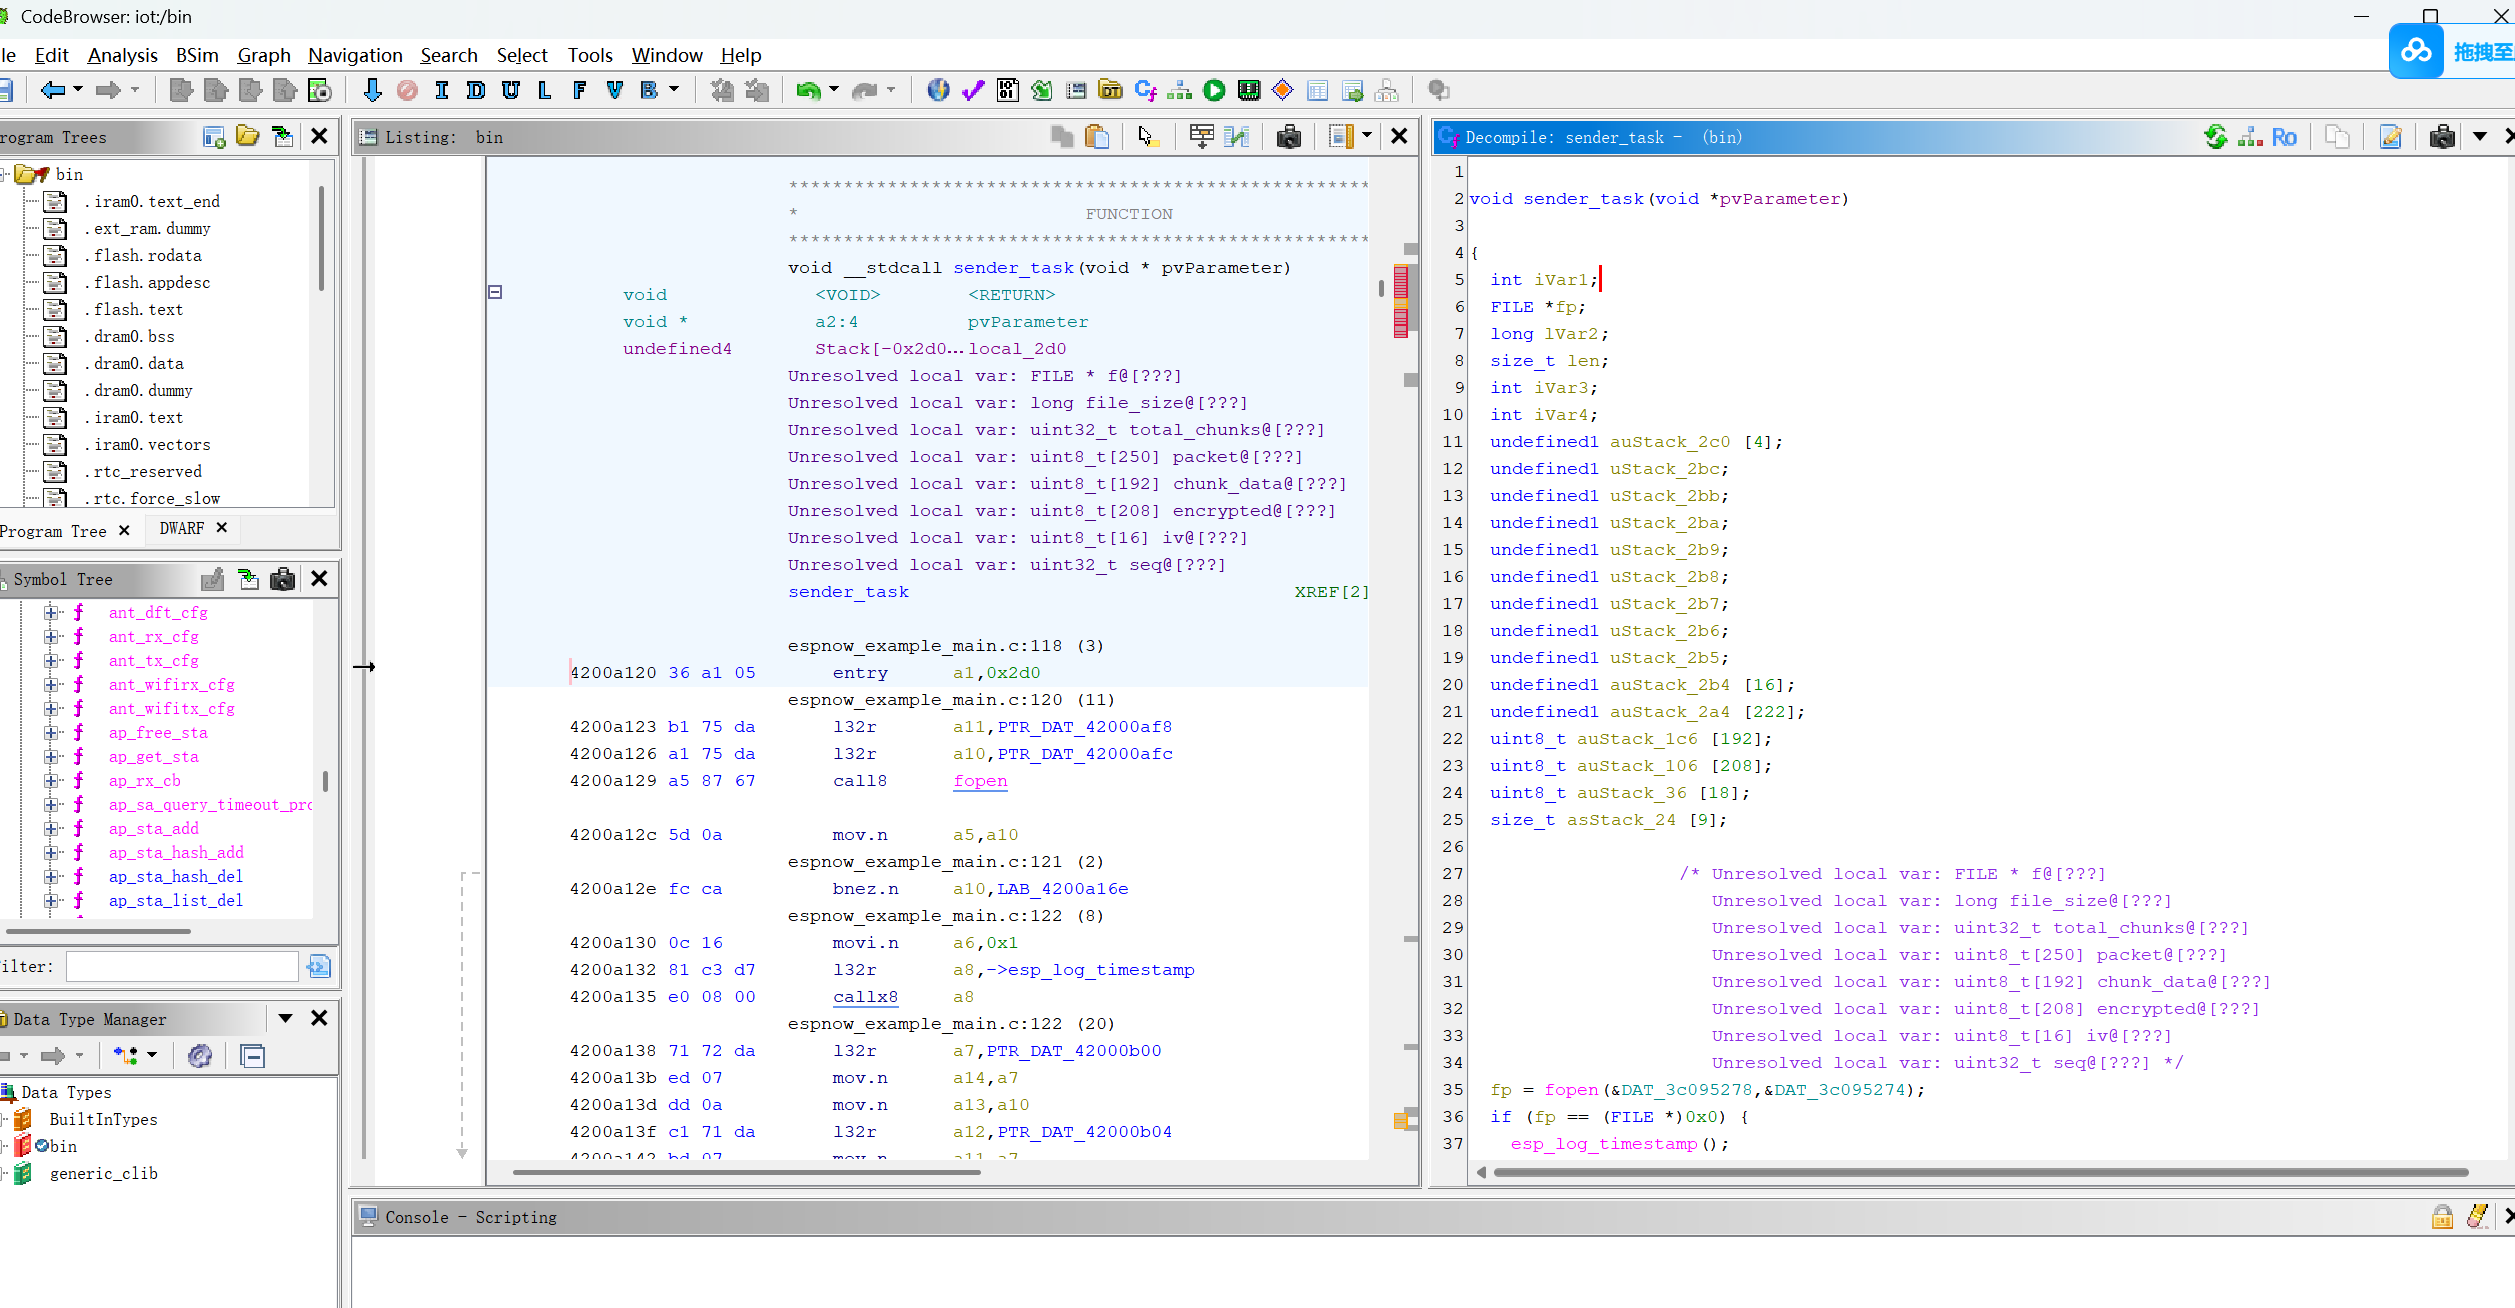
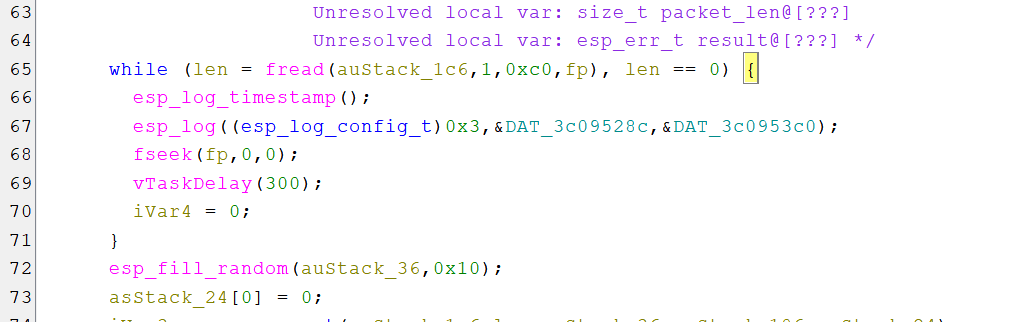
分析sender_task函数:
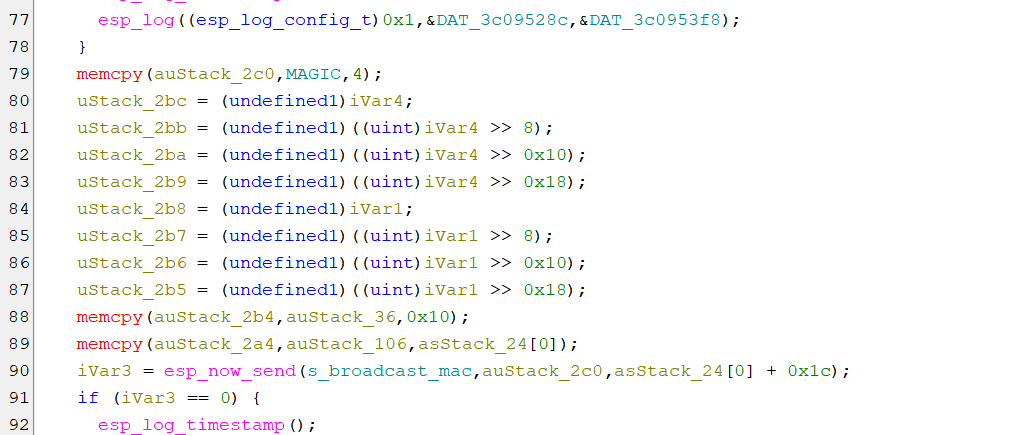
1
2
3
4
5
6
7
8
9
10
11
12
13
14
15
16
17
18
19
20
21
22
23
24
25
26
27
28
29
30
31
32
33
34
35
36
37
38
39
40
41
42
43
44
45
46
47
48
49
50
51
52
53
54
55
56
57
58
59
60
61
62
63
64
65
66
67
68
69
70
71
72
73
74
75
76
77
78
79
80
81
82
83
84
85
86
87
88
89
90
91
92
93
94
95
96
97
98
99
100
101
102
103
104
105
void sender_task (void *pvParameter) { int iVar1; FILE *fp; long lVar2; size_t len; int iVar3; int iVar4; undefined1 auStack_2c0 [4 ]; undefined1 uStack_2bc; undefined1 uStack_2bb; undefined1 uStack_2ba; undefined1 uStack_2b9; undefined1 uStack_2b8; undefined1 uStack_2b7; undefined1 uStack_2b6; undefined1 uStack_2b5; undefined1 auStack_2b4 [16 ]; undefined1 auStack_2a4 [222 ]; uint8_t auStack_1c6 [192 ]; uint8_t auStack_106 [208 ]; uint8_t auStack_36 [18 ]; size_t asStack_24 [9 ]; fp = fopen(&DAT_3c095278,&DAT_3c095274); if (fp == (FILE *)0x0 ) { esp_log_timestamp(); esp_log((esp_log_config_t )0x1 ,&DAT_3c09528c,&DAT_3c095298); esp_log_timestamp(); esp_log((esp_log_config_t )0x1 ,&DAT_3c09528c,&DAT_3c0952c8); vTaskDelete((TaskHandle_t)0x0 ); return ; } fseek(fp,0 ,2 ); lVar2 = ftell(fp); fseek(fp,0 ,0 ); iVar1 = (lVar2 + 0xbf ) / 0xc0 ; esp_log_timestamp(); esp_log((esp_log_config_t )0x3 ,&DAT_3c09528c,&DAT_3c095314); esp_log_timestamp(); esp_log((esp_log_config_t )0x3 ,&DAT_3c09528c,&DAT_3c095350); esp_log_timestamp(); esp_log((esp_log_config_t )0x3 ,&DAT_3c09528c,&DAT_3c095378); esp_log_timestamp(); esp_log((esp_log_config_t )0x3 ,&DAT_3c09528c,&DAT_3c09539c); esp_log_timestamp(); esp_log((esp_log_config_t )0x3 ,&DAT_3c09528c,&DAT_3c095314); iVar4 = 0 ; do { while ( true ) { while (len = fread(auStack_1c6,1 ,0xc0 ,fp), len == 0 ) { esp_log_timestamp(); esp_log((esp_log_config_t )0x3 ,&DAT_3c09528c,&DAT_3c0953c0); fseek(fp,0 ,0 ); vTaskDelay(300 ); iVar4 = 0 ; } esp_fill_random(auStack_36,0x10 ); asStack_24[0 ] = 0 ; iVar3 = aes_encrypt(auStack_1c6,len,auStack_36,auStack_106,asStack_24); if (iVar3 == 0 ) break ; esp_log_timestamp(); esp_log((esp_log_config_t )0x1 ,&DAT_3c09528c,&DAT_3c0953f8); } memcpy (auStack_2c0,MAGIC,4 ); uStack_2bc = (undefined1)iVar4; uStack_2bb = (undefined1)((uint)iVar4 >> 8 ); uStack_2ba = (undefined1)((uint)iVar4 >> 0x10 ); uStack_2b9 = (undefined1)((uint)iVar4 >> 0x18 ); uStack_2b8 = (undefined1)iVar1; uStack_2b7 = (undefined1)((uint)iVar1 >> 8 ); uStack_2b6 = (undefined1)((uint)iVar1 >> 0x10 ); uStack_2b5 = (undefined1)((uint)iVar1 >> 0x18 ); memcpy (auStack_2b4,auStack_36,0x10 ); memcpy (auStack_2a4,auStack_106,asStack_24[0 ]); iVar3 = esp_now_send(s_broadcast_mac,auStack_2c0,asStack_24[0 ] + 0x1c ); if (iVar3 == 0 ) { esp_log_timestamp(); esp_log((esp_log_config_t )0x3 ,&DAT_3c09528c,&DAT_3c095428); } else { esp_log_timestamp(); esp_err_to_name(iVar3); esp_log((esp_log_config_t )0x1 ,&DAT_3c09528c,&DAT_3c095454); } iVar4 = iVar4 + 1 ; vTaskDelay(10 ); } while ( true ); }
这是一个通过ESP-NOW发送加密文件的应用,也就可以知道,我们需要解密capture.raw文件
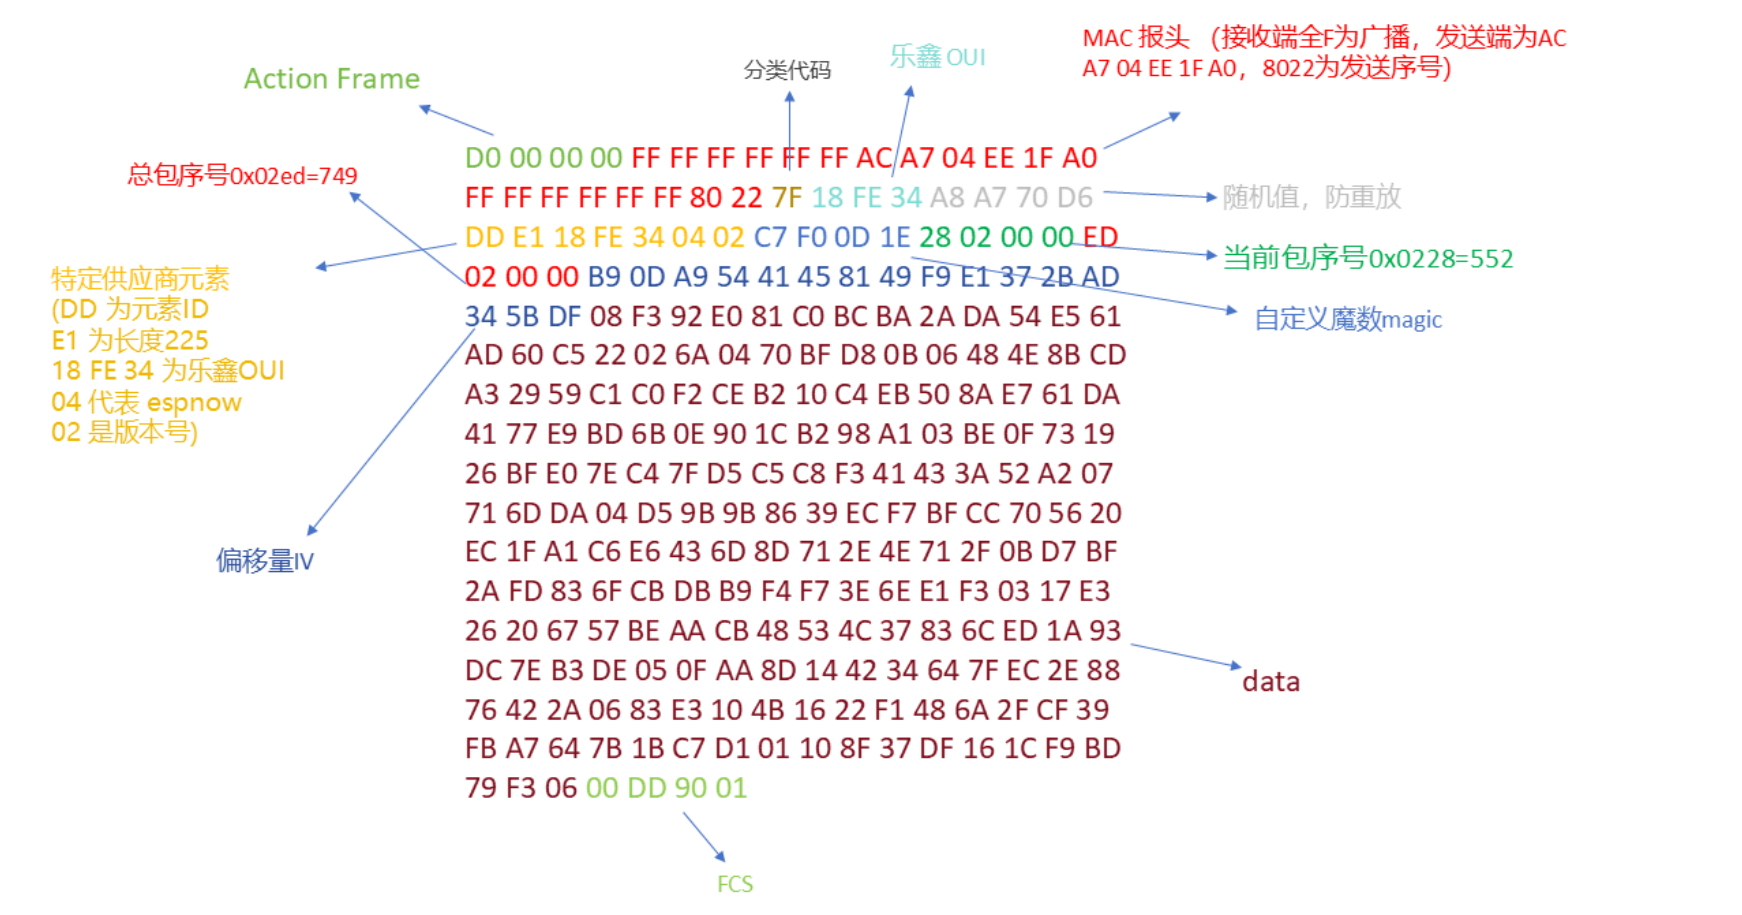
这里定义了数据包结构:
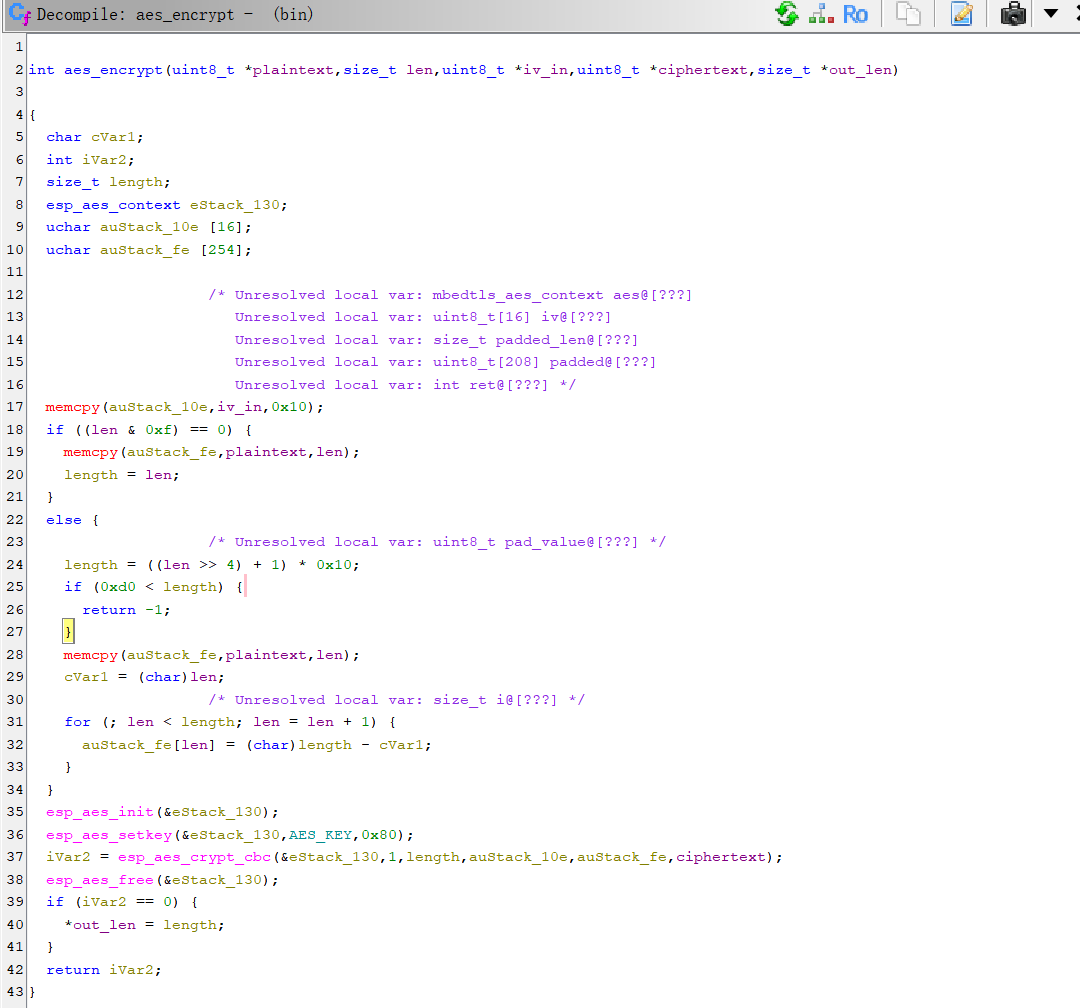
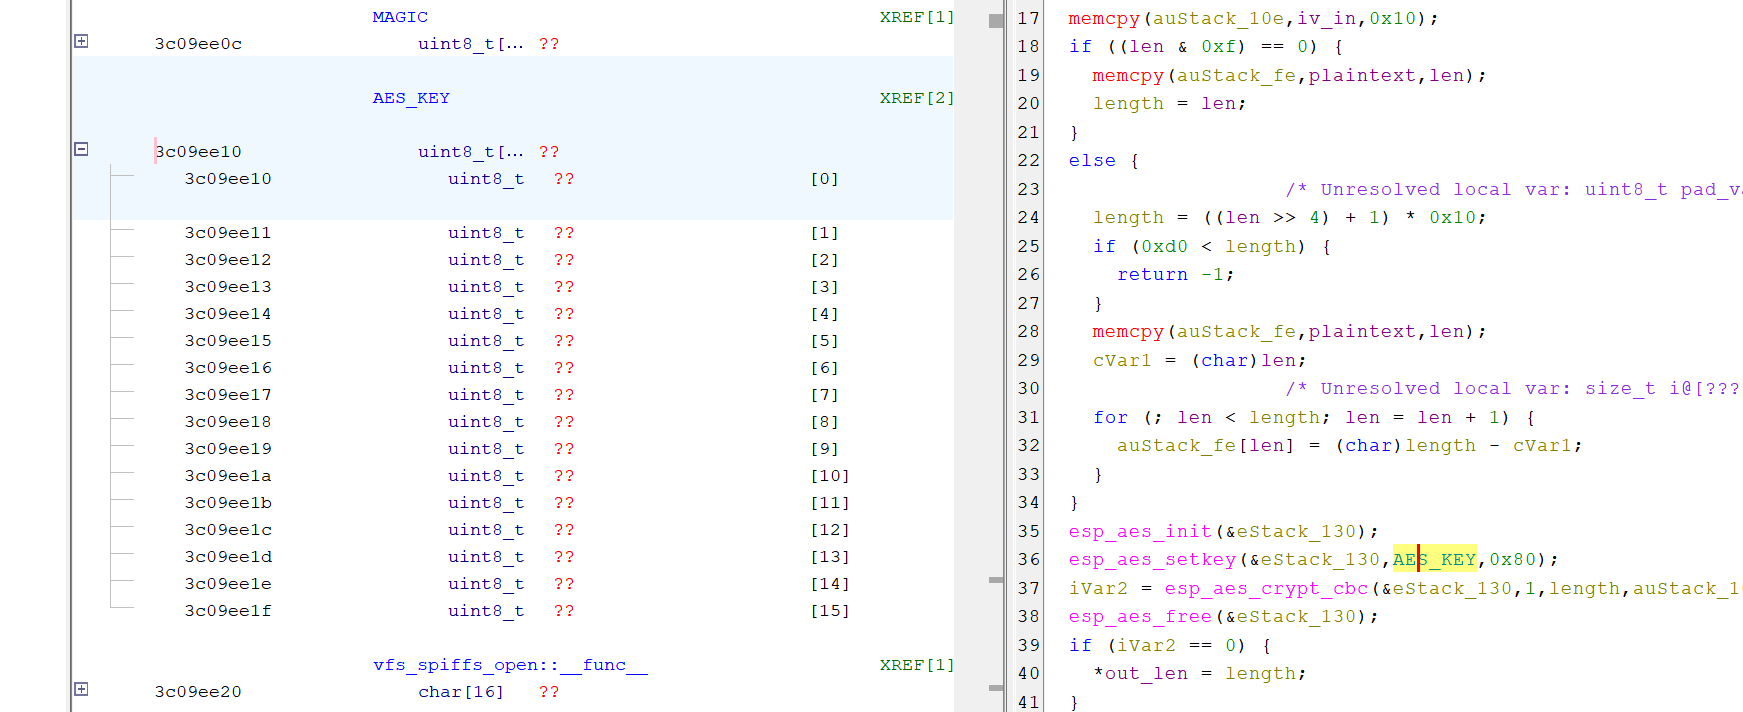
分析aes_encrypt:
可以得出这是AES-128-CBC加密
结合sender_task函数的fread来看,每次读取长度为0xc0(192=16x12),长度不够时PKCS#7 填充
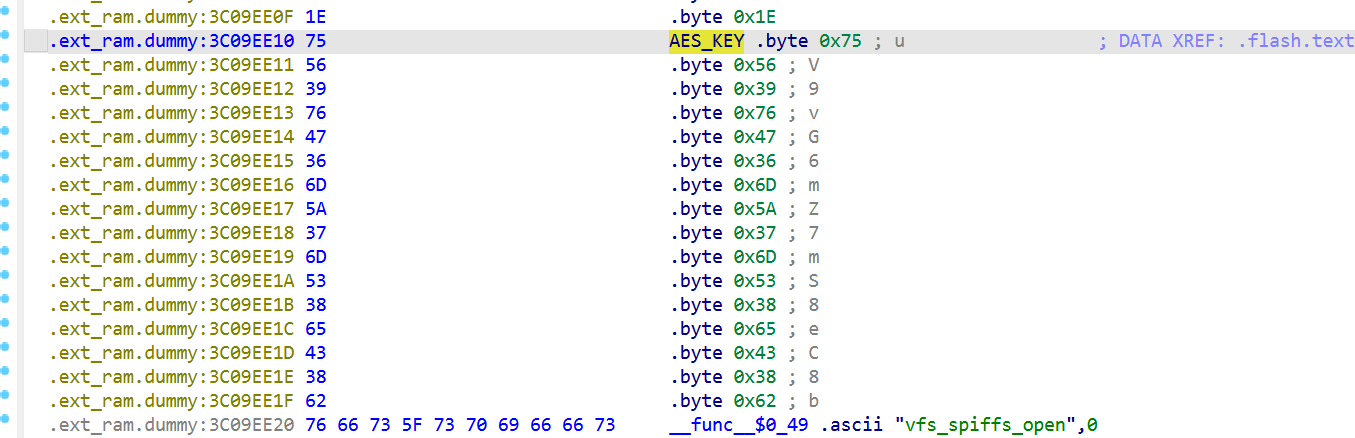
现在还差aes的key,但是ghrida中无法看到key的值:
需要使用ida再次分析,拿到key
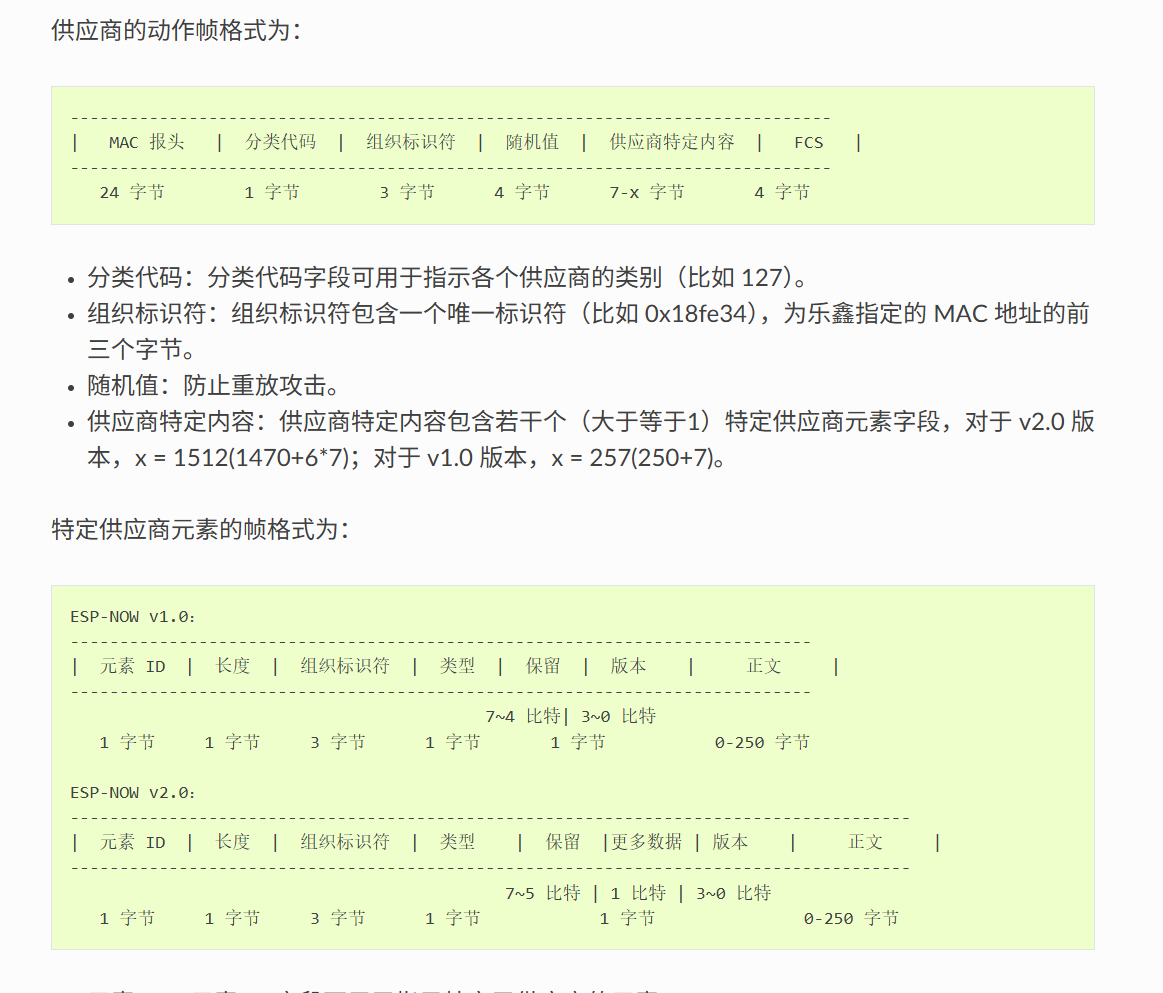
结合espnow的数据帧格式 :
选取其中一段数据进行解析:
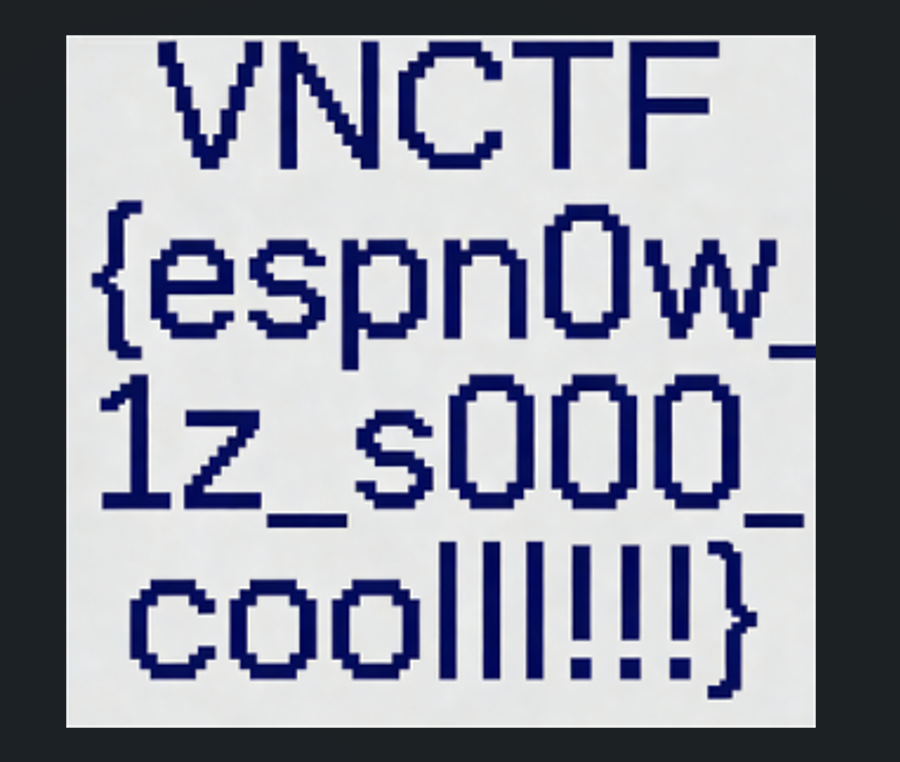
写出解密脚本,恢复图像:
1
2
3
4
5
6
7
8
9
10
11
12
13
14
15
16
17
18
19
20
21
22
23
24
25
26
27
28
29
30
31
32
33
34
35
36
37
38
39
40
41
42
43
44
45
46
47
48
49
50
51
52
53
54
55
56
57
58
59
from Crypto.Cipher import AESfrom Crypto.Util.Padding import unpadimport structAES_KEY = b"uV9vG6mZ7mS8eC8b" MAGIC = b"\xC7\xF0\x0D\x1E" STATIC_HEADER = b"\xD0\x00\x00\x00\xFF\xFF\xFF\xFF\xFF\xFF" INPUT_FILE = "capture.raw" OUTPUT_FILE = "decrypted.png" with open (INPUT_FILE, 'rb' ) as f: raw_data = f.read() frames = [] offset = 0 while True : idx = raw_data.find(STATIC_HEADER, offset) if idx == -1 : break next_idx = raw_data.find(STATIC_HEADER, idx + 10 ) if next_idx == -1 : next_idx = len (raw_data) frames.append(raw_data[idx:next_idx]) offset = next_idx chunks_dict = {} total_chunks = 0 for frame in frames: magic_idx = frame.find(MAGIC) if magic_idx == -1 : continue if magic_idx + 28 > len (frame): continue seq, total = struct.unpack('<II' , frame[magic_idx+4 :magic_idx+12 ]) iv = frame[magic_idx+12 :magic_idx+28 ] total_chunks = total if len (frame) < magic_idx + 28 + 4 : continue encrypted = frame[magic_idx+28 :-4 ] if len (encrypted) % 16 != 0 : continue cipher = AES.new(AES_KEY, AES.MODE_CBC, iv) decrypted = cipher.decrypt(encrypted) chunks_dict[seq] = decrypted chunks = sorted (chunks_dict.items()) with open (OUTPUT_FILE, 'wb' ) as f: for seq, data in chunks: if seq == total_chunks - 1 : try : data = unpad(data, 16 ) except : pass f.write(data)